Redfin: 14 Projects You Can Do At Home

Redfin: 14 Projects You Can Do At Home

home activities

Hey Studio Families, A couple months ago RedFin asked Essem Art Studio to contribute a project idea for a blog post featuring projects you can do at home with your littles and display with pride. So, I shared one of my all time favorites, a Mixed Media Heart Collage Project that is sure to spark joy and brighten up the walls of your lovely home. What I love most about this particular project is that you can use whatever materials you have on hand, it’s possible to do this project with artists as little as 12 months old (with a co-creating adult) and it is just a joyful and engaging process. Here’s how you can do this project at home.

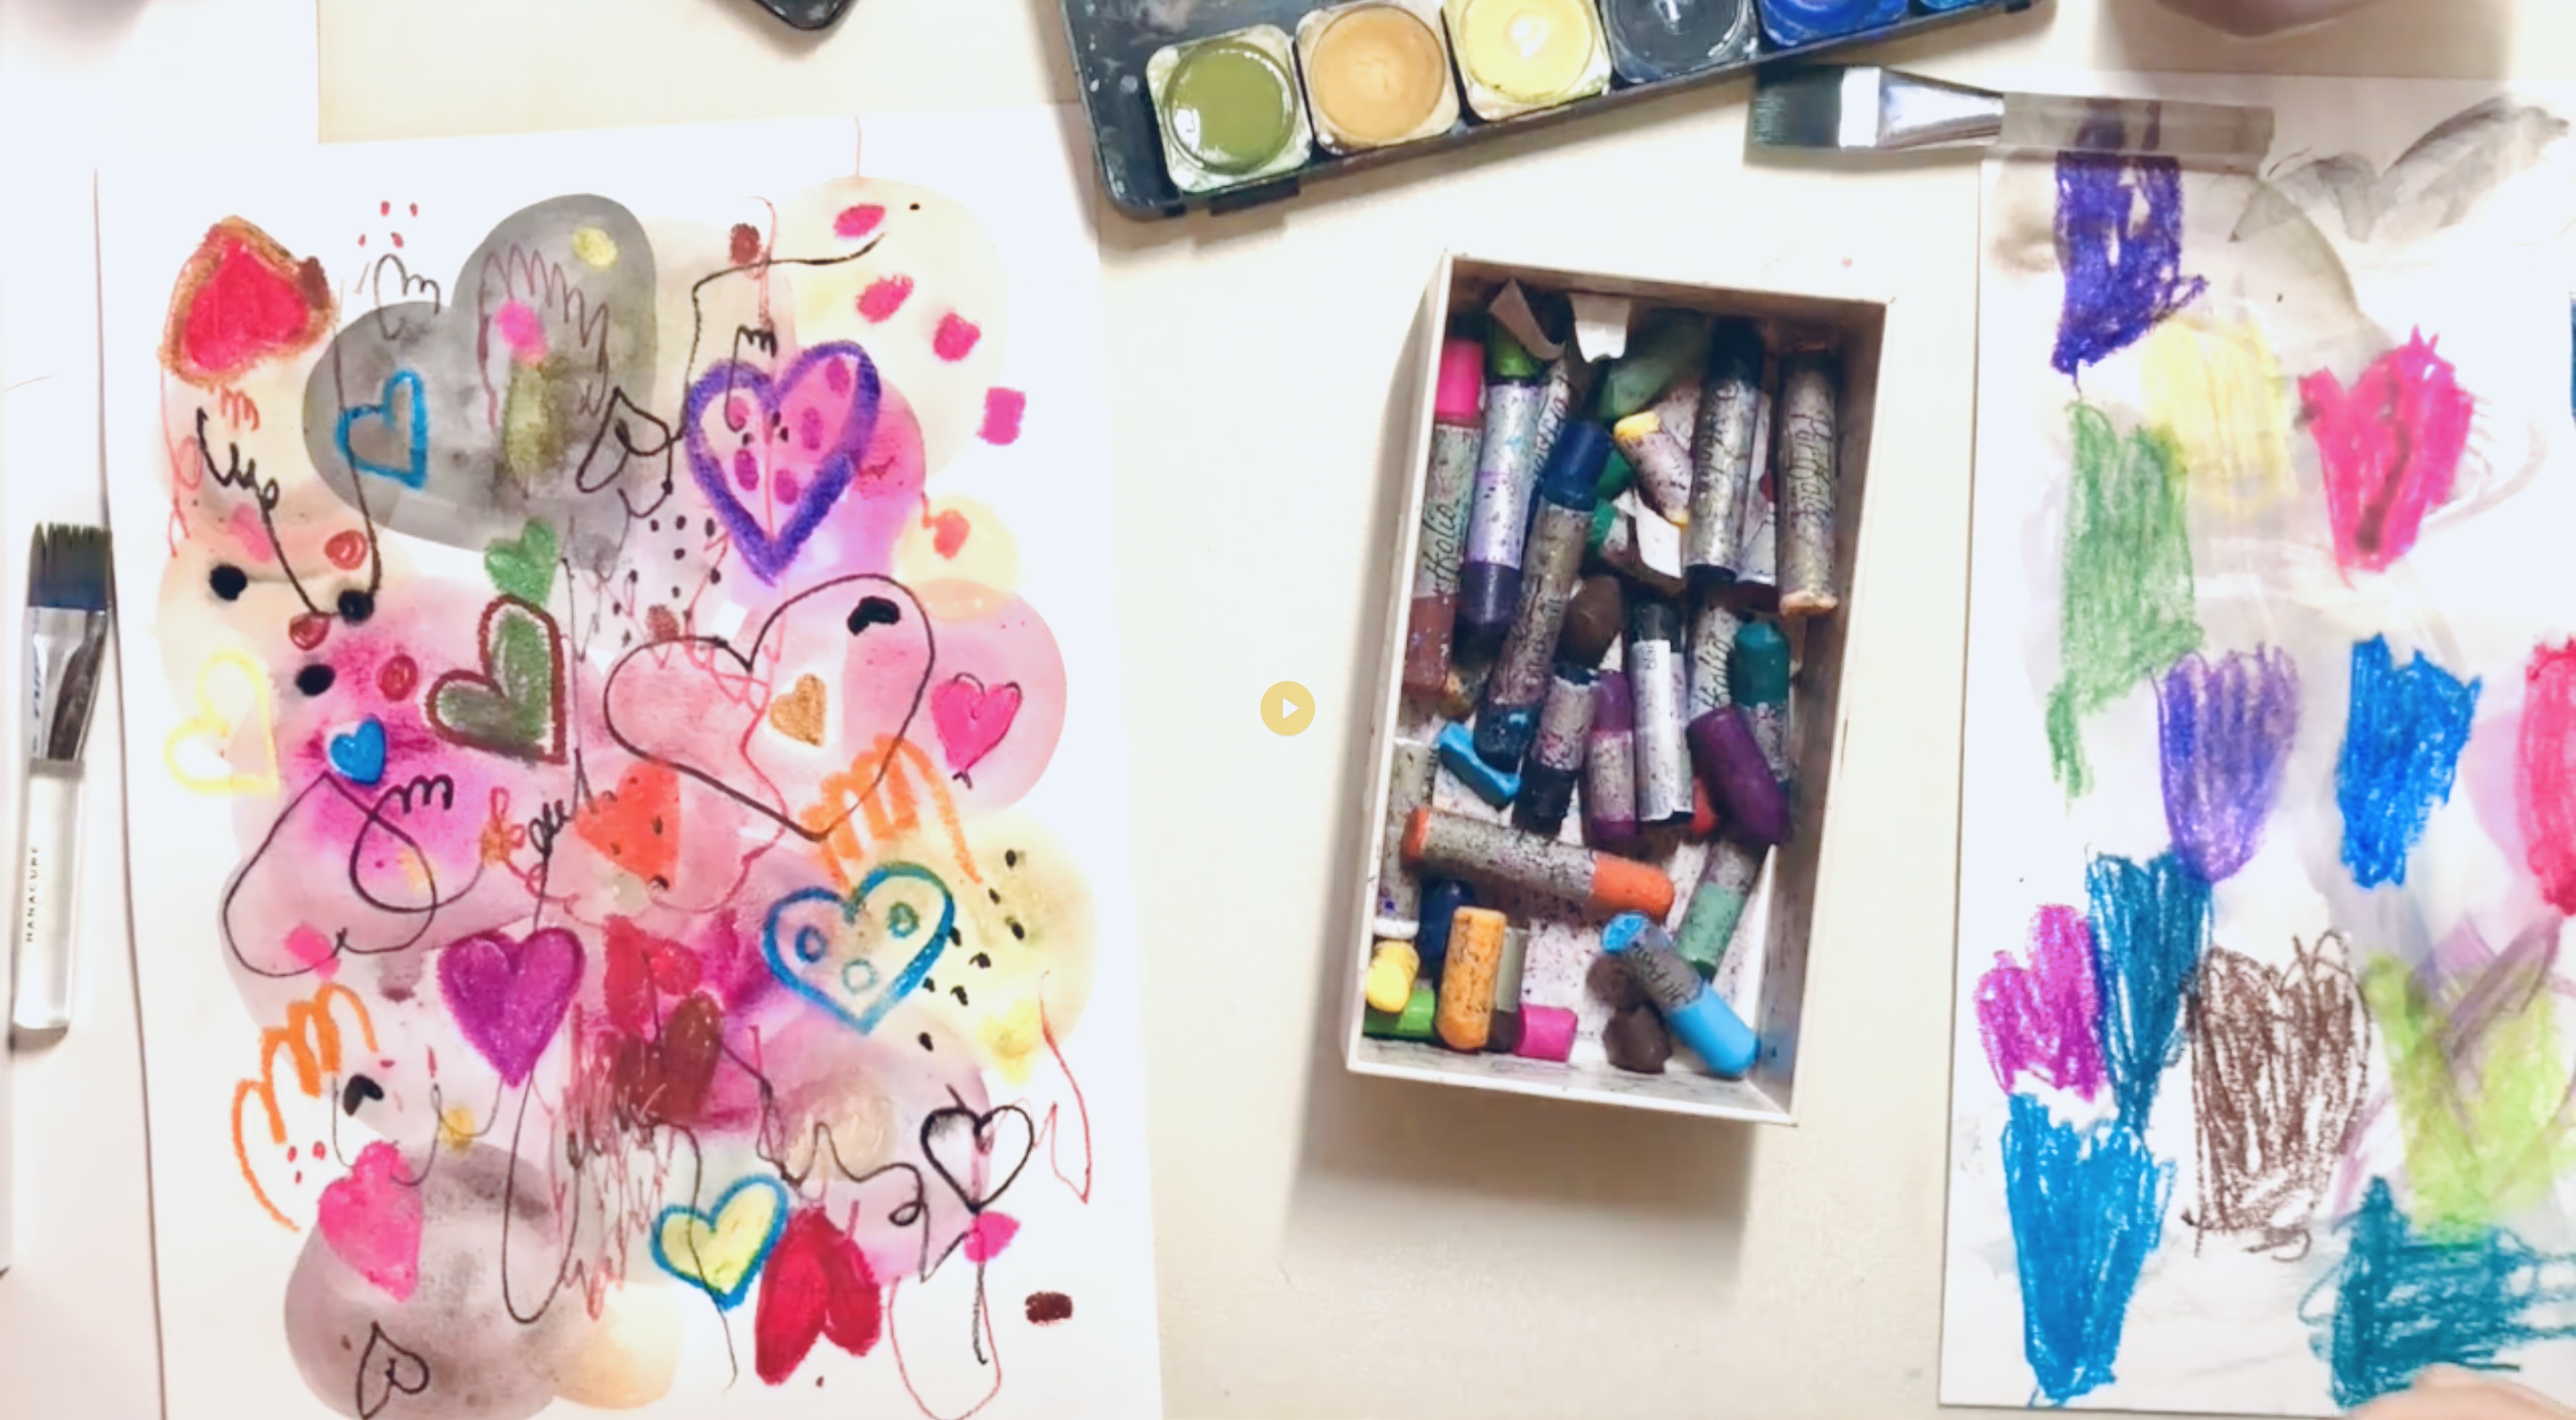
Step 1: Fill one side of watercolor or mixed media paper with abstract marks, shapes, and colors using different materials (crayons, pastels, color pencils, watercolors). Mix and match materials to create great textures and patterns.

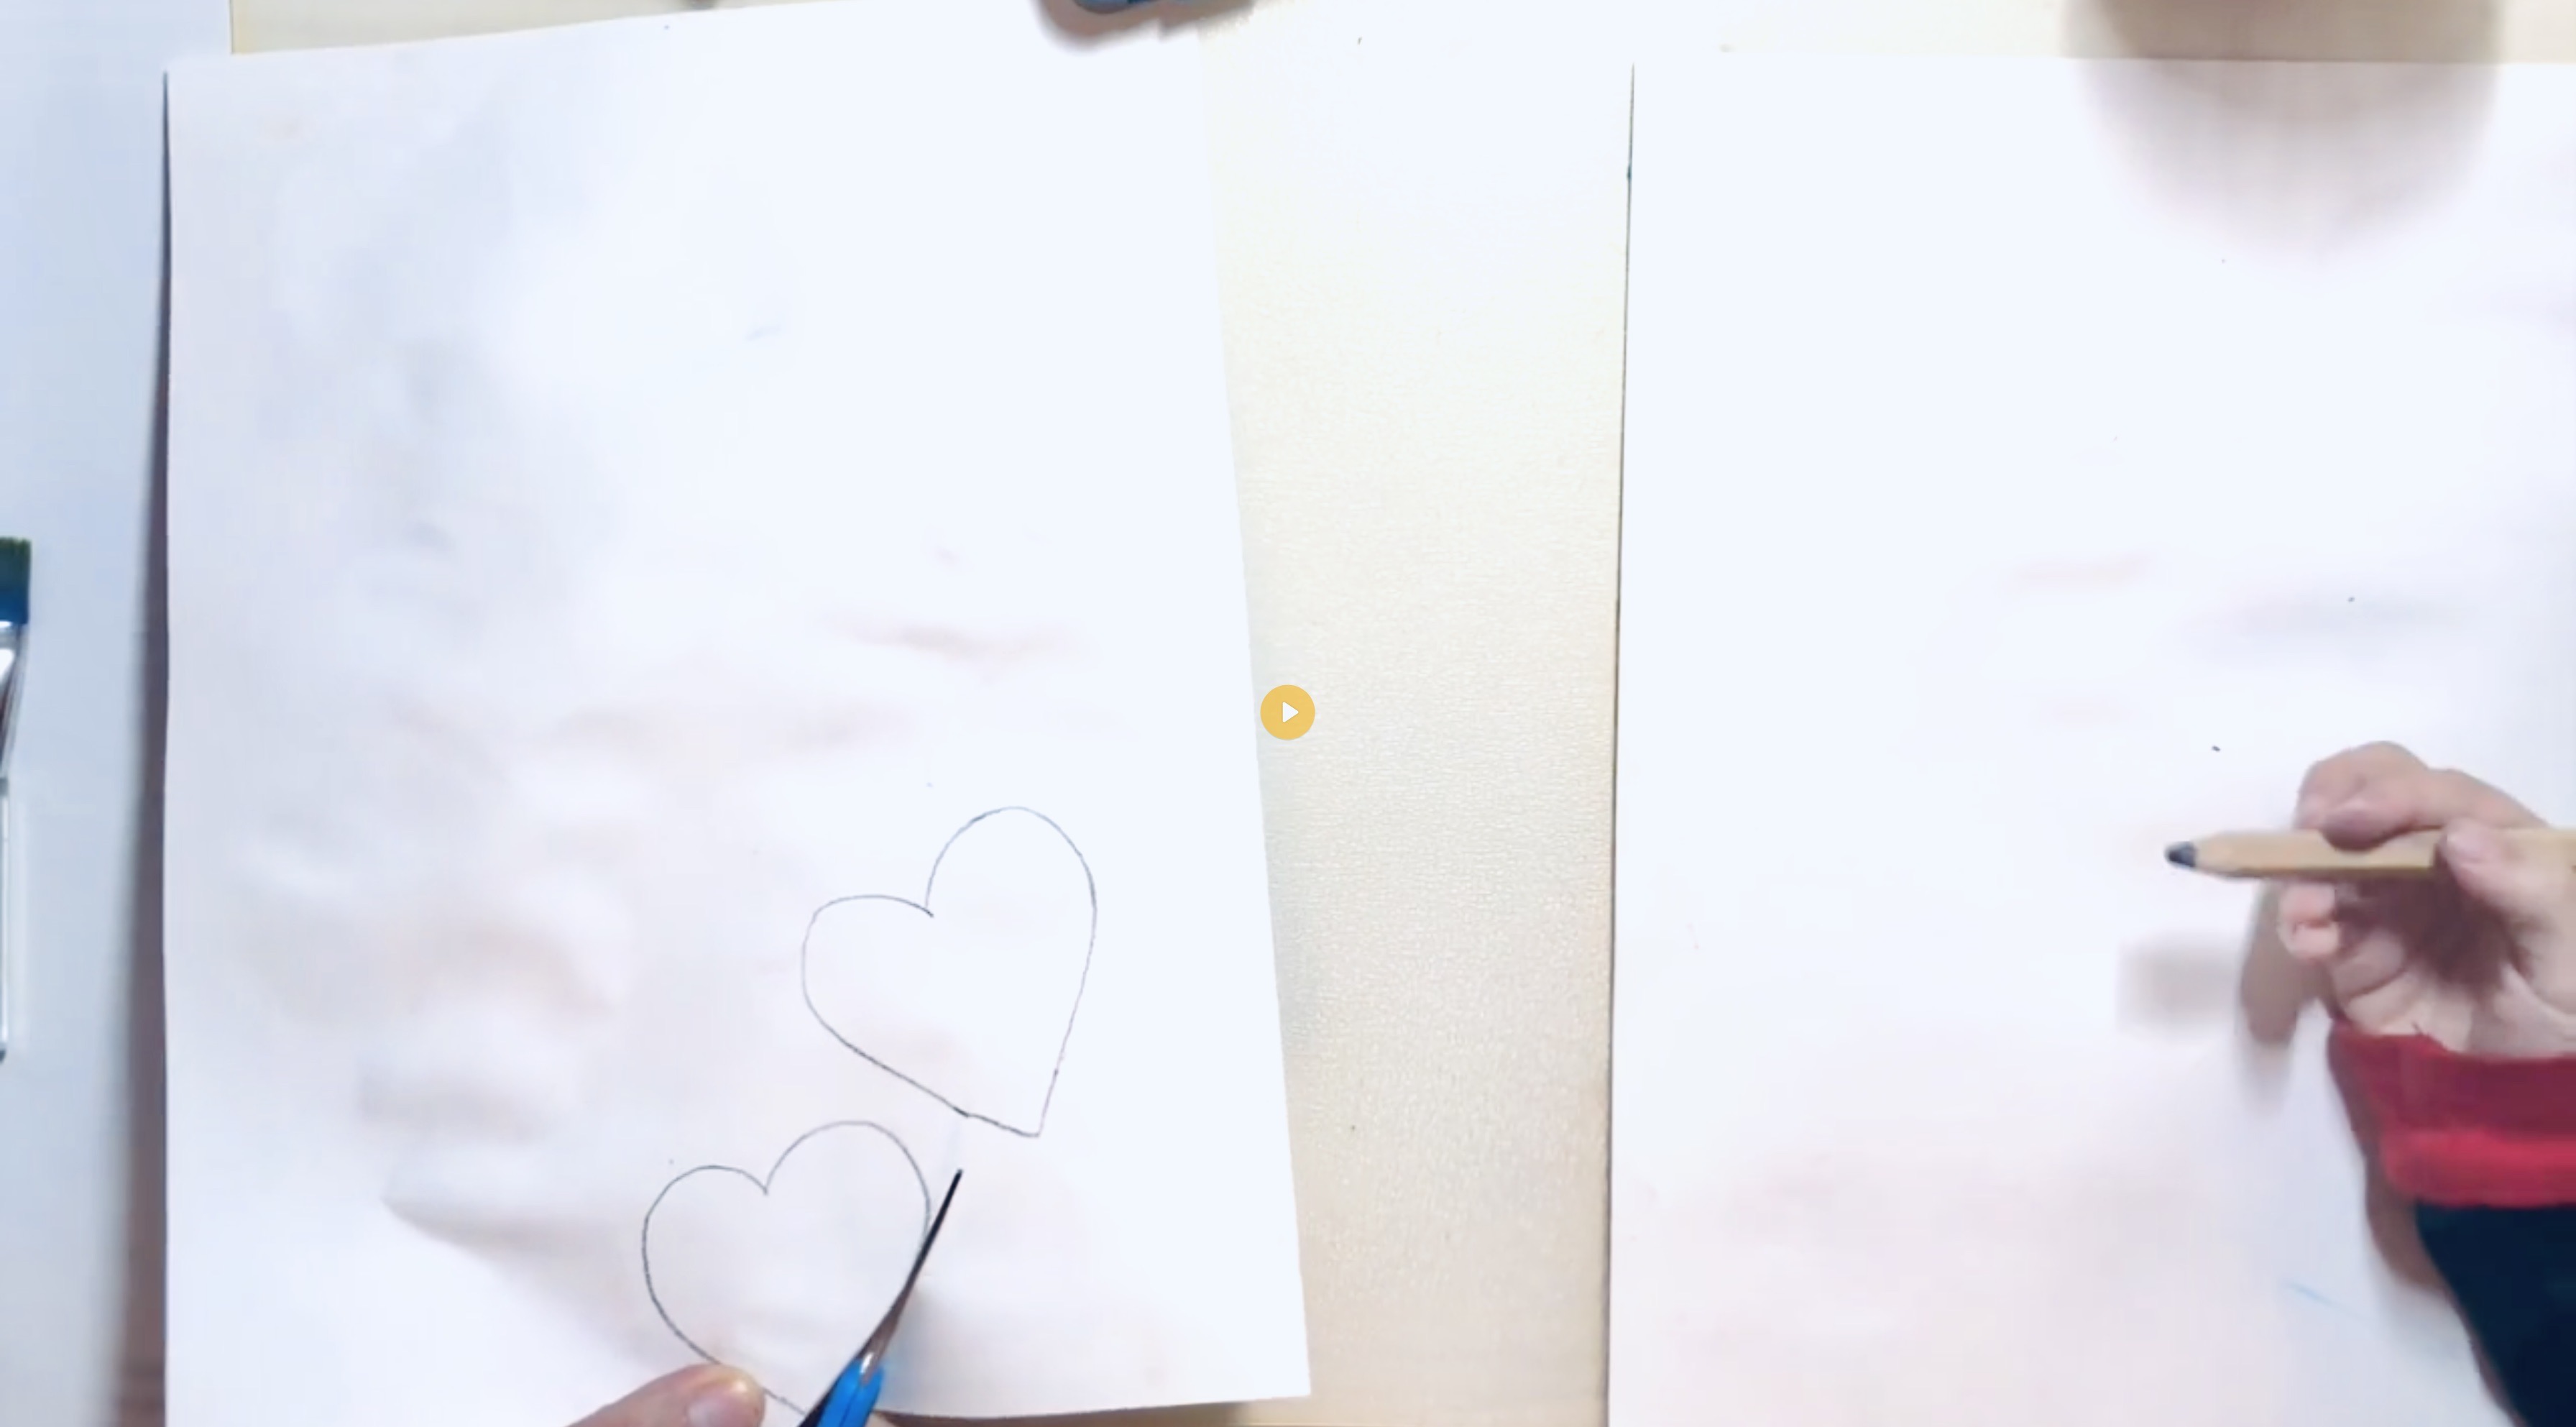
Step 2: Once the page is filled with colors, let it dry (if applicable), then flip the page over and draw heart outlines of all sizes. Cut out all the hearts.

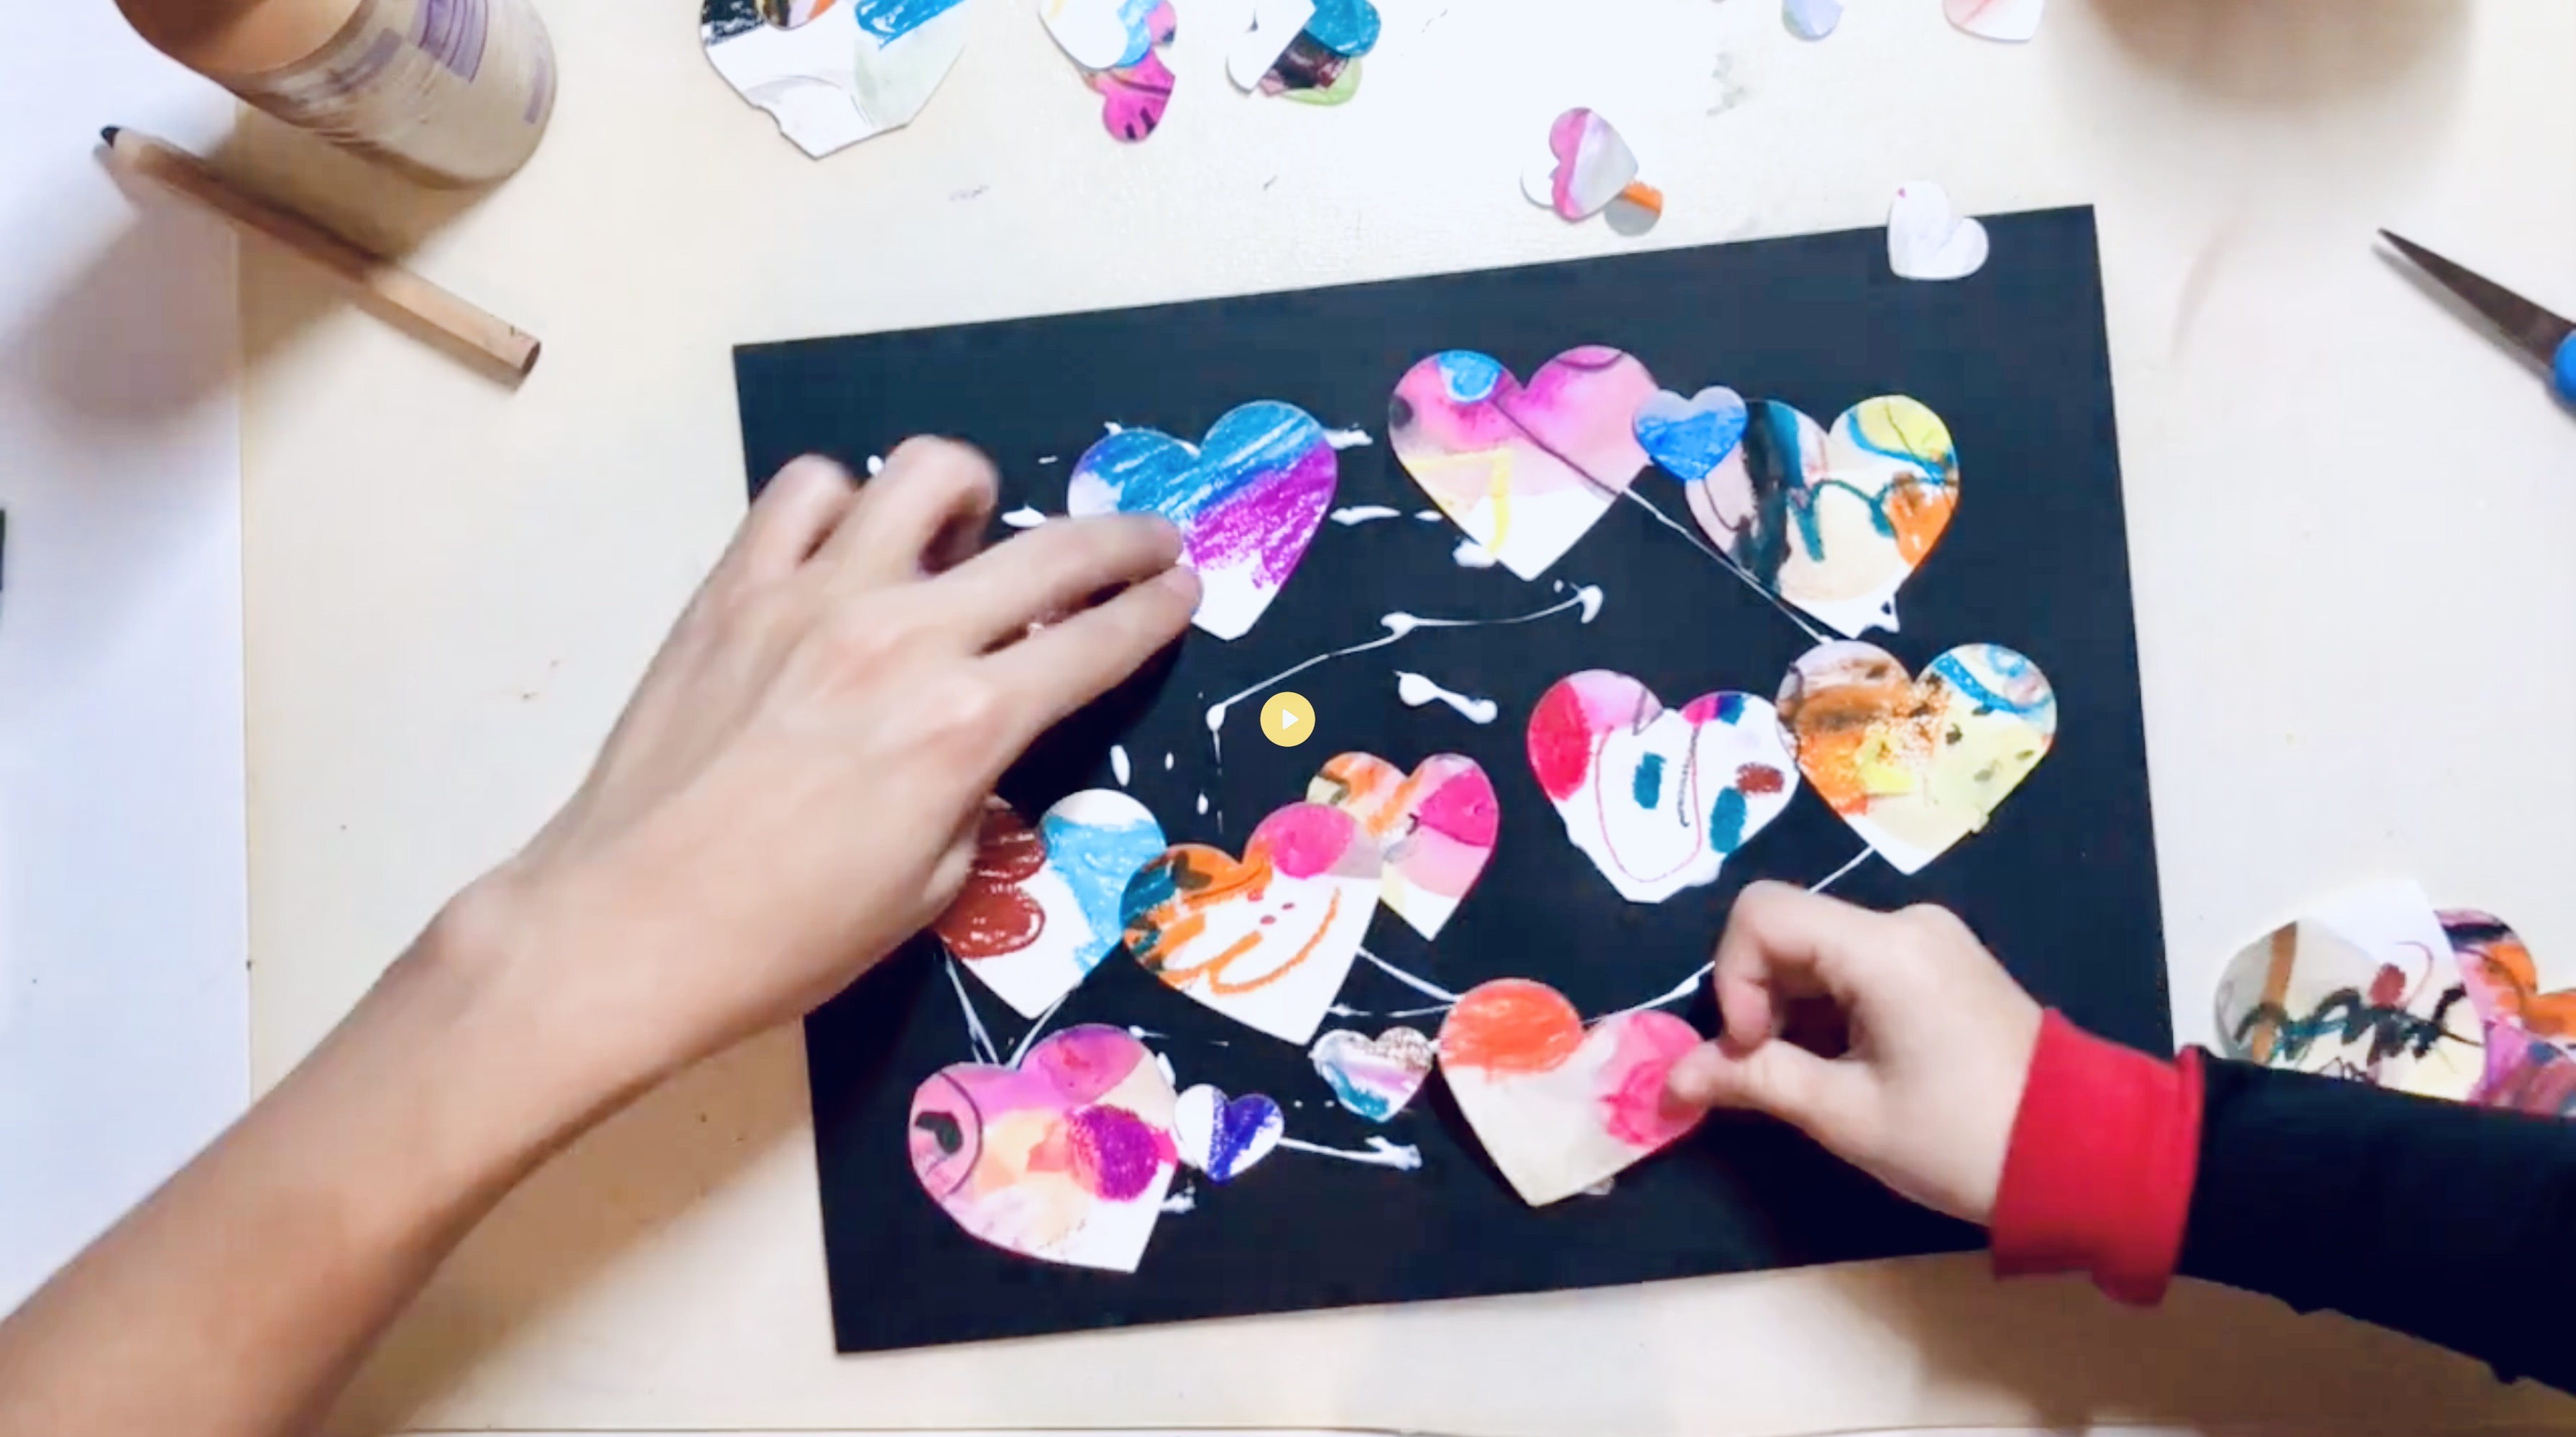
Step 3: Choose a sheet of construction paper to match your décor or find a color that compliments your heart cutouts. Arrange the hearts and glue them down.

If you would like to display in a shadow box display, you can let the hearts come off the page for a 3D effect. Beautiful!!!

You can check out the article for even more great curated ideas as we embark on a new year – one that I hope is filled with more love, more joy, and lots of creative energy! Click to read article.

Our “Go To” Kids Art Materials…

Our “Go To” Kids Art Materials…

Resources home activities

It’s easy to become overwhelmed with all of the art supplies to sort through to build your at home studio for your little artists. So, we’ve compiled a list of our favorite “go-to” kids art supplies for you from a variety of suppliers. We use these materials for our virtual art labs and keep these in stock at home at all times.

If you are just starting to introduce art materials at home, you can also purchase Curated Essem Art Starter Boxes for toddlers (18+ months) and little artists (3+) in our shop. Our curated boxes have a wide selection of starter materials for you to explore with your artists at home.

Tempera Paint Stickslove the buttery rich texture of paint sticks for layering and cardboard crafts.

Watercolorsthe fluid and free blending nature of watercolors can be so much fun.

Tempera Paints – basic tempera paints for

Color Pencilsthese pencils are water soluble and they are dynamic to use as dry/wet medium.

Oil Pastelsthese are water soluble pastels which also make them dynamic as a wet/dry medium while being super rich in texture.

CrayonsThe twist crayons are great for avoiding broken crayons and come in some super fun colors. 

Toddler CrayonsEgg shaped crayons are perfect for little hands to explore mark making.

Paint BrushesThis set of brushes is a great starter set for little artists. 

Scissorsthese are blunt tipped kids scissors great for small hands. 

Toddler ScissorsThese toddler scissors are great as starters, super safe

Glue Sticks 

Tacky Glue


Mixed Media Paper – this sturdy paper holds up so well for various projects including water based projects and also layered craft projects

Construction Paper – love the colors of this construction paper… this paper stands out against the typical bland construction paper

Origami Paper – this colorful variety of paper and paterns is dynamic for adding colors and textures with any and all projects.


Some of our favorite crafting materials are: Foam Stickers, Boogly Eyes, Buttons, Rhinestones, Pom Poms (large and small).


Zoom Art Parties

Zoom Art Parties

creative play home activities zoom art party

Want to bridge the distance gap and take your virtual face time to a whole new level? Whether its 6ft of social distance or across state lines, our private Zoom Art Parties are a great way to engage in an art activity with a select group of your favorite people.

For kids parties, we will work with you to select a theme and an age appropriate project that is exciting and novel. We’ll procure the materials and put the art kits together with everything a little artist will need to participate in our open ended art invitation. We also provide shipping or local delivery (in Charlestown) for an additional fee.

We also host adult art parties (ladies nights in, family activities, couples paint nights, etc.) and provide the full range of services from concept to execution.

A healthy lead time is about 4-6 weeks to plan a party. You can contact us at hello@essemartstudio.com for more information and to discuss the scope of your ideas.

🌈 Let us help you celebrate your special occasion with joy and art!


Essem Art Club

Essem Art Club

Virtual Art Lab community home activities

(ages 3+) Tuesday and Saturdays, every other week via ZOOM.
Drop-in Fee: $15/ per family | ESSEM INSIDERS: FREE

Gather your art/craft materials and join us for some creative fun. We encourage artists to get creative and use the materials available at home! Let’s explore contemporary styles of art and creative expression; experiment in different art styles, and cultivate creative confidence through open discussions and promoting mindfulness and healthy creative habit.

Register Now


Morning Music + Art Lab

Morning Music + Art Lab

Virtual Art Lab art labs creative play home activities music

(Ages: 2+) Monday and Friday mornings, every other week via ZOOM.
Upcoming dates: Mondays (Feb 1, 15, Mar 1, 15) | Fridays (Feb 12, 26, Mar 12, 26)
ESSEM INSIDERS (free) | Drop-ins ($15)

Our Music + Art series is a live virtual program on ZOOM featuring a fun singalong of classic/original kids music followed by a colorful and engaging art project. The main aim is to help little artists start building creative confidence and develop fine motor skills.

Click to register via Eventbrite for your preferred events.

Register Now


At Home Art Supplies

At Home Art Supplies

creative play home activities

Hello there. I’ve been getting a lot of questions about materials for continuing creativity at home, and having tried a great many different materials at home and in the studio, I’m super happy to provide a list of economical, lovely to use art and craft materials. These recommendations are simply based on my opinion and I hope it helps as we parents embark on the joys of homeschooling and creating with our little artists.

For those of you who are local to Charlestown, where we live and have our studio, we love to support our local businesses, so I want to start by giving a shoutout to our very own Mockingbird shop. They’ve put together an Arts & Crafts section and here are some items that you might really love:

Ooly brand supplies are always great, Ariana and I especially love their color change markers, which are truly magic markers; and their Chunky paint sticks have a smooth buttery texture with vibrant colors that kids delight in as well. Check out the Mockingbird Arts & Crafts Aisle. Support Local whenever possible.

Here are some other items I think are really versatile, economical, and delightful to have at home. The setup is pretty basic – a set of vibrant watercolors, a good heavy weight paper that can withhold some water and mixed media work, colored construction paper, twistable crayons (which break less frequently than regular crayons) tacky glue for sticking things, Glitter Glue to add some sparkle. And lastly, a dry erase clipboard is just great for doodling and sketching out ideas.

Putting the “shopping list” aside for a second, I want to also point out that there are SOOO MANY ways to upcycle items in your own home—milk cartons, egg cartons, plastic container, straws, CARDBOARD (my favorite), dried flowers, aluminum foil, kebab sticks etc. When taking inventory of what you can create with, try to broaden your idea of what might work and save items for play.

If you have any questions, please don’t hesitate to ask me! 🙂

Arteza Watercolors

Tacky Glue

Canson XL Mixed Media Paper

Sunworks Construction Paper

Crayola Twistable Crayons –

Dry Erase Clipboard

Glitter Glue

Oil Pastels

Paint Brush Set (Ikea)

Watersoluble Color Pencils (Ikea)

Requested additional links:

The pictured supply sorter/organizer 

No Cook Peppermint Play Dough

No Cook Peppermint Play Dough

home activities recipes

In the past I’ve shared a play dough recipe that I also love, but it required cooking over the stove and I found that Ariana couldn’t really engage in the process as much. This time, we modified a “no cook” recipe and we were able to work together more. We counted and measured out the ingredients, she mixed, and even when I mixed in the boiling water, she could sit next to me and watch. For that reason, I slightly prefer this “no cook” recipe.

Give it a try and let me know what you think! 🙂


Ingredients:

2 cups of all purpose flour

1 cup salt

3 cups of cream of tartar

2 tbsp of veg oil

1.5 – 2 cups of boiling water

*optional peppermint oil

*if you prefer pumpkin spice, add pumpkin spice

*optional food coloring


Directions:

Mix all dry ingredients. Add veg oil. Add boiling water. Mix with a large spoon. Let it sit for a few minutes. When sufficiently cool, start kneading. Enjoy the process. It is therapeutic.

You can add food coloring before or after kneading the dough.


⋒ Homemade Pumpkin Spice Play Dough Recipe ⋒

⋒ Homemade Pumpkin Spice Play Dough Recipe ⋒

creative play home activities recipes

Play Dough has become a huge part of our sensory experience at home and at the studio for our toddler Music + Art Labs. It’s a great way to keep little artists engaged on our weekly theme after their main art projects are completed . I tweaked a play dough recipe I found online and added pumpkin spice for enhanced sensory experience for our New England families who are largely Autumn Leaf Peeping, Sweater Weather loving, Pumpkin Spice adoring humans. Am I right? We have successfully used food coloring to further enhance the sensory play but also we just love a good old mound of un colored dough to knead, cut, roll, and play with. Pictured, we have our colored doughs and we’re using different beans, pastas, beads, kitchen toy tools, to take the play to many different levels. It’s a wonderful way to work on motor skills and let the imagination soar.

Here is the recipe! For the parents out there who are going to try this recipe out, tag us on instagram or Facebook – let us know if you made any modifications. Also, take five minutes and just enjoy the kneading process. Its therapeutic. I absolutely love it!


⋒ HOMEMADE PUMPKIN SPICE PLAY DOUGH ⋒

4 cups all purpose flour

1 1/2 cups of salt

8 teaspoons of Cream of Tartar

4 cups of lukewarm water

4 tablespoons of veg oil

1 tablespoon (or a little more) Pumpkin Spice Seasoning

*optional food coloring and/or glitter


Directions:

Stir flour, salt, and cream of tartar in a large pot

Add water and oil.

Cook over medium/low heat, stir constantly until dough is thick and forms a ball. (This can be quite a workout for the arms once it starts to thicken up)

Remove from heat and place on wax paper or cutting board

To add colors, separate into chunks and add a few drops of food coloring. you can use plastic bags here but I find it hard to knead that way. So, use a pair of disposable gloves to spare my hands from the stains.

Knead dough. If there is a lot of cracking of the dough feels over cooked, you can fill a bowl of water and wet your hands as you knead the dough to work in some moisture.

*Stores for 3 months

*Super Pro tip: After playing with the dough, roll into a ball to maintain supple texture. If you notice it is getting dry or flaky, just wet your hands a little and knead some moisture back into the dough before storing.


Happy Creative Play, friends! ⋒


⋒ Invitations to Create at Home (every single day) ⋒

⋒ Invitations to Create at Home (every single day) ⋒

creative play home activities

Let’s talk about invitations to create… simple ones we can implement in our homes that don’t require great efforts in set up and clean up that are also age and skill appropriate. What used to be our coffee table from Ikea is now A’s art/craft table at home. There’s nothing super picturesque about our setup… it’s not instagram worthy by a lot of standards but it’s our real, unstaged setup. We have a simple tray to hold jars, cups, and repurposed boxes to organize/display different mark making tools, a placemat to catch most extraneous marks, and a big pad of paper that we always have turned to a blank page. Loose work as well, but can get cluttered so we prefer the pad for this purpose.

The tools should be ones your little artist has already mastered, to some degree. Don’t put out scissors if your kid doesn’t know how to handle them safely. Put out materials you’re comfortable leaving with your kid semi-unsupervised. In the beginning, this may just be a set of washable chunky crayons. As they start getting bigger and more comfortable with a larger range of tools, you may be tempted to lay it all out. This can be overwhelming so try to limit it to a few different textures and tasks.

Spark joy: On some mornings before I leave for the studio, I’ll pose on of A’s dolls dressed in a funny outfit and doodling… a playful invitation to play that is one of the first things she notices when she comes out of her room in the morning. I’ll add one more note to keeping it organized, labeled, and well maintained – it teaches little artists to respect the tools they use. They learn that everything has a right place and needs to be cared for – they are learning a great life skill. Nothing stops creativity in its tracks quicker than dried out, crusty materials. Am I right? 🤓 What are some ways you invite your little artists to create?


What’s currently on our tray?

Crayola Twist Crayons

Water-soluble color pencils (always sharpened)

Magic Markers

(1) Drawing Pencil

(1) Dry Erase Marker

Tempera Paint Stick Pens

Oil Pastels

(1) Scizzors

Elmer’s Glue

Small grid notebook

One large 11×15 Drawing Pad


Homemade Strawberry Banana Popsicles… 😋

Homemade Strawberry Banana Popsicles… 😋

creative play home activities recipes

For a little kid (and the kid within us all) nothing really beats a delicious frozen popsicle on a sweltering, hot day. Am I right? In our family, we try our best to limit our “added sugar” and artificial ingredient intake and sometimes that means witnessing the wistful eyes of our toddler when she sees other kids enjoying brightly colored and lovely looking sugar cookies, candy, and colorful bomb pops.

So, this summer, we’ve ventured into making popsicles at home… and we are all loving it. This is a fun kitchen activity we can do together, and the whole family partakes in the treats. Here’s a basic recipe that makes six 3-ounce popsicles. We’ve tried a bunch of flavors but this one is our favorite so far.


⋒ Strawberry Banana Popsicles ⋒

2 bananas (3 if your kid is a banana monster like ours)

6 strawberries

1 cup of almond milk (any milk)

Honey (to taste)

Vanilla (tiny dash) *optional

Muddler – You can blend as well, but we like the chunks of fruit so we use a muddler, a fork works as well.

Popsicle Mold – We loved the Zoku Classic Popsicle mold that we purchased on amazon but there are tons of fun characters and shapes out there to try.


Simple Steps: so simple a kid can do it… 

Just muddle/fork/squash/blend the fruits together. The juicy strawberries do get on clothes so don’t wear white (I may or may not be speaking from experience 🤦🏻‍♀️).

Add honey (a little will do if the fruit is sweet) and a dash of vanilla. Stir in almond milk.

Pour into the molds and prepare to answer the question “Are they ready yet” for the rest of the waking hours of the day.